Pages

Showing posts with label Indian. Show all posts

Sunday, July 3, 2011

Mushroom Pepper Fry


Photobucket


Photobucket


I love mushrooms in all forms. Some of the other mushroom recipes on my blog are, Black Eyed Peas with Mushrooms, Mushroom Ragout on Garlic Toast. There are very few things that Rj eats without any qualms, which aren't under the category of Non Veg food. Mushrooms happen to be one of them. So i'm always on the look out for an interesting way to cook them. This recipe is spicy n' really hits you with its flavours n' we love having it with a simple daal n' chapathi or rice. I have added cubed capsicum to balance the spice and its a winner. So here you go...


Photobucket


Ingredients :

1. Mushroom : 200 gms (each sliced into 4 pieces)
2. Onion : 1 no
3. Green chilies :2 nos. (slit)
4. Bell Peppers (Capsicum) : 1/2 cup (chopped)
5. Garlic: 1-2nos (crushed)
6. Curry Leaves: as much as you like (the more the better)
7. Pepper Powder - 3 tbsp (use freshly crushed for best results)
8. Oil - 2 tsp
9. Mustard seeds
10. Salt to taste

Method:

Step 1: Heat oil in a wok , add mustard seeds n' curry leaves to do a tadka.

Step 2: Add chopped onions n' garlic and saute till onion turns translucent.

Step 3: Add green chillies and mushrooms. Sprinkle salt on the mushrooms n' allow it to ooze out the water. On high flame allow the water to evaporate while stirring the mushrooms occasionally.

Step 4: Then reduce the flame to sim , add the pepper powder, stir it in n' allow it to cook well. Add the cubed/chopped bell peppers at this stage. (they cook quickly, n' hence I prefer to keep it crunchy i'm adding it at this stage. If you want them well cooked add them along with the mushrooms in step 3.)

Its best served with Daal, Rice or Chapathi. :)...Happy Cooking!


Photobucket


Photobucket


Saturday, June 25, 2011

Ragi Puttu Upma

I wanted to do this blog post yesterday....but between catching up with friends n facebook n' gtalk n' all that...I didn't get the time to....:(...so I might as well do 2 posts today....


Photobucket


Most mallu families would've made Puttu Upma with leftover puttu as a tea time meal....my mom's taste divine coz she adds left over beef ularthiyathu into it as well n that takes the whole thing a notch higher in my books. I have made this upma without adding Beef and it still tastes nice. I wasn't a big fan of a beef less upma until my aunt, Sandhyachechi, came n' stayed with me. She made this upma with the leftover Puttu from breakfast n' I really loved it...Now I don't wait to have leftover puttu for this anymore. I make puttu just for this upma.


Photobucket


Talking of Upma did you read/hear about New York's celebrated chef, Mumbai-born Floyd Cardoz who made Upma for a contest in NY and won a big ticket prize of $ 100,000 (that roughly around Rs 45 lakhs). The theme? "prepare an item based on food memories. " Imagine that....the simple n' one of the most common south indian dish winning his such a big ticket! I shouldn't make it sound too simple, he did prepare a very exotic version of our common upma with wild mushrooms n' I think Chicken...(not sure about the chicken part). Anyway, apparently after all this hoopla in NY over exotic Upma, restaurants all over the capital here, have been getting orders for extoic upma (more than ever before) from tourists. I'm reading this article in the Hindustan Times, sitting on Rajdhani Express with the worst upma I have ever tasted for breakfast...:(...sad or what????


Photobucket


My upma here is 'oh so simple', but tastes really good. For an added health factor I have started including ragi in our food whenever the recipe permits it. For benefits of Ragi...please check out this page at itsnotmadrasi. You get Ragi Puttu podi/powder in all the stores now. Brands like Eastern, Double Horse, Nirapara etc. So do try them out if you haven't done so already. I'm mentioning a simple way to make puttu too...just for those who haven't had it. So here you go...


Photobucket


Ingredients:

For Puttu
1. Ragi Puttu Podi/Powder: 2 cups
2. Grated Coconut: ½ coconut (at least) more if you like it like me...:)
3. Salt: to taste
4. Water: enough to crumble the mixture. (don't add too much water or you will be left with a dough instead of a crumble.)

For Puttu Upma:
1. Ragi Puttu: 2cups (roughly)
2. Mustard seeds: ¾ tsp
3. Black gram: ¼ tsp (if you don't have this, use the regular tur dal n its still taste great)
4. Onion: ½ cup (chopped)
5. Green chillies: 2 (chopped) or less if you don't like it spicy
6. Ginger: 1 tsp (finely chopped)
7. Curry leaves: 1-2 sprigs
8. Salt (Optional) (as puttu already has salt)
9. Ghee/Clarified butter: 1 tsp

Method:

For the Puttu
I did not use a puttu maker for this, I used the steamer plate/thattu (Dhokla maker plates) in the idli maker instead, coz I was anyways planning to make the upma with the puttu instead of puttu itself. Since I don't do pictorial step by step, please check out this blog for a good way of making traditional Puttu. For the non traditional one, follow my steps here.

Step 1: Add salt n' water to the puttu powder to get the crumble required. Powder the mixture with your hands to form a coarse n soft crumble.

Step 2: Add scraped coconut to the above. I add a generous amount, coz i love the taste.

Step 3: Heat water in the idli maker, once the water boils, place the steamer plate above the water n' fill it with the above mixture. Steam it until cooked well. (roughly 5-10mins or less) The puttu is ready.

For the Upma

Step 1: In a kadai/ wok, add the ghee and do the tadka with mustard seeds, Dal n' add the curry leaves.

Step 2: Add the chopped ginger, fry it a little, add the chopped onion n' green chilies to this. Fry it well.

Step 3: Add the cooked puttu mix into this n' stir well. Adjust the salt if required. Sprinkle in a little water, if you think the puttu is not soft enough. And viola! its ready....


Photobucket


Serve it with some Kaddala Curry/ Chole or even a spicy meat curry (I served it with my Chicken Chettinad) and it needn't be something you serve only at tea time. Make it a meal. :) Happy Cooking!!!

Thursday, May 26, 2011

Paneer Bhurji/ Scrambled Cottage Cheese

Photobucket

My amma came n' stayed with me for a week n' my relationship with milk completely changed. :)...does that sound weird? But really, I couldn't make you understand what i'm talking about any other way. Now, I make curd, fresh cream, butter n' ghee at home. Well not all in one day...but you get the picture. I never knew it could be this easy. Cooking for 2, the only thing out of this which has a lot of demand on a daily basis is curd n' love how well the curd sets. I could give all the curd companies out there a run for their money...lol.

Photobucket

I'm digressing, what I wanted to say was, previous to amma's visit the only milk product I used to make at home is Paneer. But the major problem with it was I could never cut perfect cubes/squares etc out of my home made paneer. Coz they won't hold a shape like that. I would hang it in a muslin cloth n' end result is always a large ball liked shape that would love to crumble. So I had stopped making paneer at home for my dishes like Punjabi Paneer Makhani, Hara Bhara Paneer n' Paneer Tikka Masala. But my homemade paneer especailly coz it loves to crumble is best for Paneer Bhurji. On a day when you are not in the mood for elaborate cooking, this is just perfect with Chapathis. By the way I follow the Vahrehvah Chef Sanjay Thumma's instructions to make paneer at home.

Photobucket


This dish is by far the only thing I make without a written recipe. I searched online n didn't find any recipe I liked n' thought to myself, how difficult can making something like this without a recipe be. So here you go, my version of a Paneer Bhurji. :)

Photobucket

Ingredients:

1. Paneer: 200gms (soft paneer) crumbled.
2. Onion: 1no (small) chopped
3. Garlic: 4-5nos (chopped)
4. Tomato: 1no (deseeded) chopped
5. Greenchili- 2nos
6. Capsicum/ Bell Pepper- 1no (deseeded n' cubed)*
7. Egg: 1no (optional)
8. Turmeric Powder: a pinch
9. Chili Powder: 1/2tsp
10. Garam Masala: a pinch or 2
11. Oil
12. Mustard seeds- 1/2tsp
13. Curry Leaves
14. Salt: as per taste

* I have used yellow, red n' green capsicums just to get that burst of color, you can just use any one color n' it would still taste nice.

Method:

Step 1. Heat a oil in pan, add mustard seeds n' curry leaves. Let it splutter.

Step 2. Add chopped onions, garlic n' green chili and leave it to cook. (2-3mins on medium flame)

Step 3. Add turmeric powder, chili powder n salt, mix it well. Allow it to cook well.

Step 4. Add the chopped tomatoes to this.

Step 5. If you are adding eggs, scramble it in another pan n' add scrambled eggs to the above mixture. (I like the texture better this way, but up to you if you want to add the beaten egg directly to the above mixture, you can.)

Step 6. Add the chopped paneer to the above n' mix it well. Leave it to cook for a while. (Ensuring that the paneer does not harden).

Step 7. Add the cubed/chopped capsicum to the above. Mix it well n' allow it to cook for another 3-4mins.

Step 8: Check for salt n' add more if you need it. Sprinkle some garam masala on top n' its ready...:)

Happy Cooking!!!

Photobucket

Tuesday, May 17, 2011

Pani Puri- Nirvana at Home

Photobucket


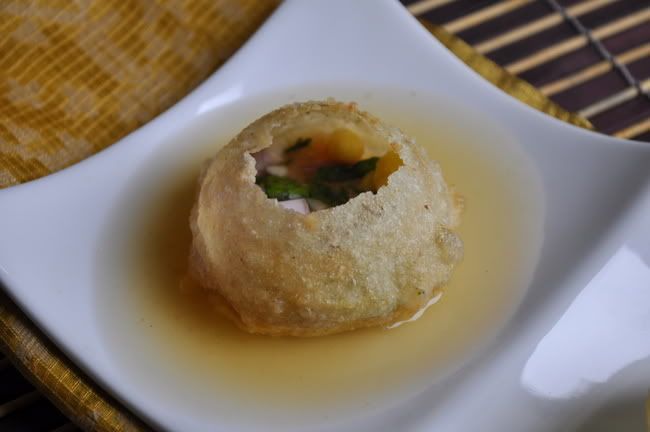
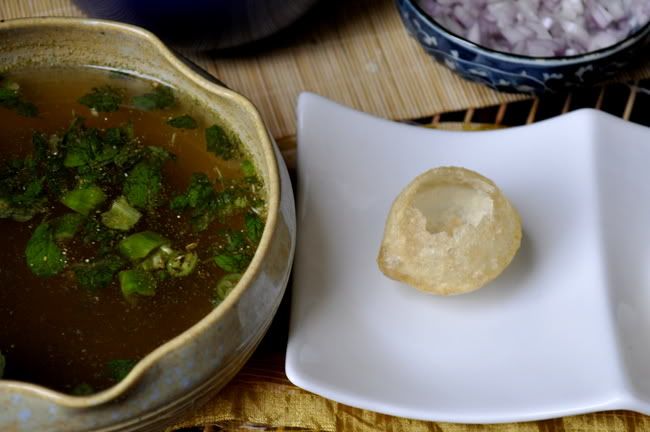
I had gone missing from blogsphere for a week simply coz I had a home full of loved ones n' was happy being busy. My mom n' my sister n' family were here with me for a vacation n' I had a great time with them....the best part about moving back to India is the amount of time I get to spend with my family. Coming back to this post. I can easily call Pani Puri my all time favourite snack....when I say all time, I really mean it....I can have it all the time/ anytime of the day n' relish it. For those who have never had it, Pani Puri is a popular street snack in India. It comprises a round, hollow puri, fried crisp and filled with a mixture of water, tamarind, chili, chaat masala, potato, onion and chickpeas. It is small enough to fit completely in one's mouth. The first time I had them was when I moved to Bangalore for my studies 10yrs back. I couldn't hold the whole puri in my mouth the first time around n' I remember thinking to myself 'how did I live to be 20 without ever tasting this?' I hunt for the best Pani Puri joint everywhere I go. In Bahrain, I had a Biharikaka who made such divine pani puri....n' he wud give me 2 extra sukka puri just to see how happy it made me, I think. ;)

Photobucket


I could have pani puri off the street vendor n' not think too much about it, but gone are those days....i'm more concerned about hygiene of the food n' the environment now. I don't eat pani puri or anything which uses water or fresh fruits n' veggies from a street vendor anymore. My youngest cousin,Indhu, who I love more than I can say, recently got typhoid n' was in really bad state. She was admitted in the hospital for 2weeks n' she has a small baby gal aged just over 1yr...everyone was so so worried about her. But now she is feeling better, the once healthy gal has become less than half her size, with really bad intestinal problems. I'm mentioning this in detail just so I can give out a word of caution to all who likes to eat from the streets. She caught it eating chat n' drinking some masala drink from one of the street vendors in Delhi. I also have to mention that her sis in law who ate/drank from the same place is ok. But really, the moral of the story is just that one needs to be cautious of where and what you are eating.

Photobucket


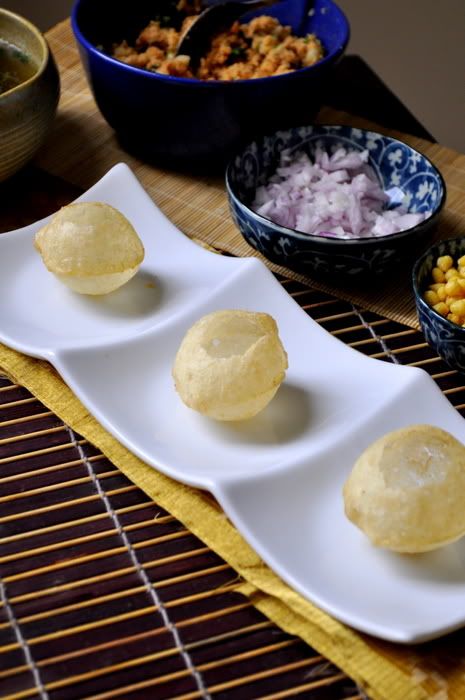
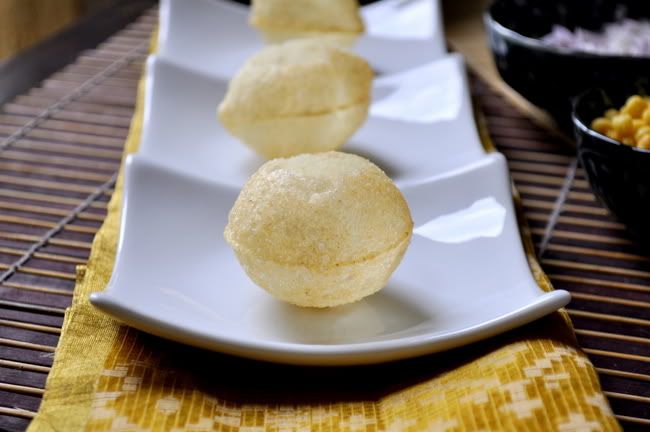
Koshy's Calcutta Chat on Brigade Road dishes out the best chat in town for me, including a good pani puri. But that being a little far off n' me not frequenting Brigade Road anymore meant I have to find a new source...My mom n' my sister loves pani puri too, so I decided to make it for them. My mom found it hilarious that she has to wait for me to finish taking some snaps before they could dig in....lol..;). I used ready to use small puris n' pani puri masala for the water. So here you go.

Photobucket


Ingredients:

1.Puri: 20nos

For the Filling:

2.Potato – 3 nos (medium-sized, boiled with salt, peeled and mashed)
3.Garlic – 2 to 3 pods (finely chopped)
4.Ginger – 1/2″ long piece (crushed/minced)
5.Coriander/Cilantro – 2tbsp (finely chopped)
6.Green Chili (optional) – 1 no (finely chopped)
7.Chili powder – 1 tsp
8.Garam Masala – 1 tsp
9.Cumin Powder – 1 tsp
10.Coriander Powder – 1/4 tsp
11.Amchur Powder/ Dry Mango Powder (optional) – 1/2 tsp
12.Salt – to taste
(add some fresh moong sprouts to get some extra flavour, I didn't have any with me so I didn't add it this time.)

For the Water:*

13. Everest Pani Puri Masala: 2tbsp
14. Lemon Juice: of half a lemon (medium size)
15. Mint Leaves: a palm full (crushed)
16. Salt: as per taste (keeping in mind that the masala already has some salt in it)
17. Green Chilli Paste: 2tsp
18. Tamarind Pulp: 2tsp
19. Dry Mango Powder: a pinch or 2
20. Water: as required (i used roughly 2cups)
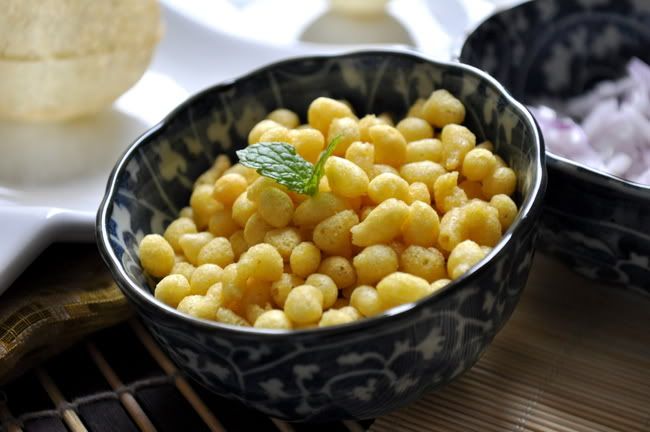
21. Boondi
22. Chopped Onion

*all the ingredients mentioned under pani puri water, can be adjusted according to taste. I have mentioned how much I have used, but change it according to your taste.
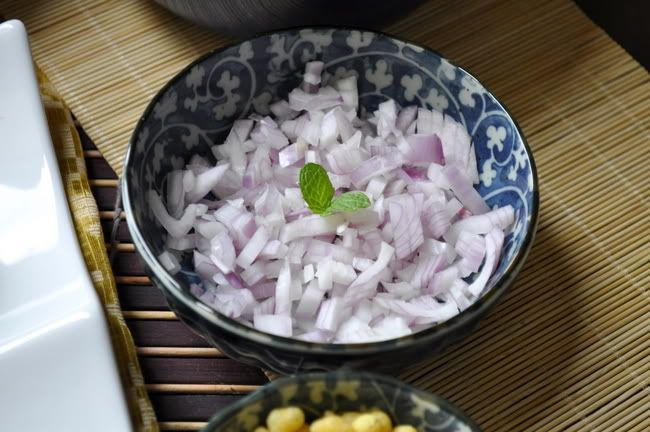
Photobucket


Method:

Step 1: Mix all the ingredients required for the Pani Puri water n' keep it aside. If you like the water chilled, keep this mixture in the refrigerator at this point. (I don't like mine chilled so I didn't do this). Do not mix the boondi n' chopped onions at this point. You can add that on top while serving.

Step 2: Mash the boiled potatoes n' mix all the ingredients. Keep it aside.

You are actually ready to serve. Even though the list of ingredients seems long, it requires hardly any prep time. Also, if you want to serve it to guests, you can do all the preparation in advance n' make the holes in the puri n' stuff the filling in, dip it in the pani puri water n' there you have it....;) mouthful, eyeful n' wonderful....lol

Photobucket

Thursday, April 28, 2011

Sanjeev Kapoor's- Hara Bhara Paneer Tikka

I have immense faith in Sanjeev Kapoor's recipes. He is referred to as "The most celebrated face of Indian cuisine" for a reason right? :). None of the recipes I have tried of his has ever failed me. My only problem is with his TV shows, they show some 3-4 dishes in like half an hour n' that means everything is happening so fast...I'm sometimes worried I'll miss out something. When I saw his show on using a grill stone for cooking, I was sure I have to try this paneer recipe that was featured. The first time I made this dish was about a year back. Have tried this many times after that n' it has always been a winner. But my paneer pieces weren't grilled to perfection, like I wanted it to and could never get a decent photograph until now.


Photobucket

I attended a BBQ session at Weber- Bangalore (outdoor BBQ grill dealers) recently and it helped me a lot with the grilling process this time around, (even though this recipe calls for grilling on the stove top.) Chef Sarabjeet, gave us a lot of pointers and it proved useful to me. They are running a weekend half a day BBQ workshop on May 1st, do let me know if you are interested, will give you the contact details. It is in fact, my favourite Paneer Grill recipe to date. So here you go.


Photobucket

Ingredients:

For the Paste:
1. Fresh coriander leaves : 2 bunches
2. Fresh mint leaves: 1bunch
3. Green chillies: 4nos (reduce if you don't like it too spicy)
4. Garlic: 10cloves
5. Ginger: 1 1/2" piece
6. Lemon Juice: 2tsp
7. Onion: 2nos (medium sized) chopped
8. Salt: as per taste
9. Hung Curd: 1 cup
10. Fresh pomegranate pearls: 2tbsp

For the Marinade:
11. Gram Flour (Besan): 4tbsp
12. Kasoori methi powder:2tbsp ( I used dried kasoori methi leaves)
13. Chat Masala: 2tsp
14. Roasted Cumin Powder: 2tsp
15. Garam Masala: 2tsp
16. Mustard Oil: 2tbsp ( I used regular Sunflower oil)

Other Ingredients:
17. Paneer (Cottage Cheese): 500gms (2 inch cubes)
18. Onion: 2nos (medium) cut into 2 inch pieces
19. Green Capsicum: 2nos- seeded(medium) cut into 2 inch pieces
20. Tomatoes: 2nos- seeded (medium) cut into 2 inch cubes

Method:

Step 1: Grind together green chillies, coriander leaves, mint leaves, garlic, ginger, lemon juice, onion, salt, yogurt and pomegranate pearls into a thick paste using very little water.

Step 2: Roast the cumin seeds n' powder it using a mortar and pestle. Roast gram flour for two to three minutes and set aside.

Step 3: Place the paneer cubes in a bowl, add kasoori methi powder, chaat masala, roasted cumin powder, garam masala powder, roasted gram flour and the ground paste and mix well. Add a tbsp of oil to this and marinate the paneer for two hours.

Step 4: Thread the paneer pieces onto skewers alternating with onion, capsicum and tomato pieces.

Step 5: Season the grill stone/pan with oil and heat. Place the skewers on the hot grill pan and grill for three to four minutes. Baste with oil, turn the skewers and cook the other side for two to three minutes. Once this was done, I turned the flame to high and grilled it over the flame for 5-6secs both sides. (this step wasn't part of Sanjeev Kapoor's recipe) Serve it hot with a dip/chutney and its gonna impress everyone.


Photobucket

I'm gonna give this recipe★★★★★ ;) Its a must try, take my word for it. Happy Cooking!


Photobucket


I'm sending this post to the event Dish Name Starts with H, hosted by Akila from Akila's Kitchen.

Wednesday, April 21, 2010

Tawa Pilaf- Chaat Style


I have been watching the Sanjeev Kapoor cooking shows on n' off for a while now. If you have seen his shows, you must have noticed how quick they are n' he makes it look like its hardly any work. I have never been good at keeping everything ready n then cooking, i go with the flow n' run all around n' pick things from here n' there. That could be one reason why i have never been able to manage step by step photos on this blog, maybe i will save some time too but i'm not too sure if n' when i will do all that...

So anyways i came across this recipe on his show for tawa pilaf, i have always wanted to try it n' decided to watch the whole show and decided to try it too. But once i finished making it and tasted it, i felt like it was more like a 'Tawa Pilaf-Chaat' than the authentic pilaf (i'm sure there will be an authentic Vegetable Pilaf recipe of Sanjeev Kapoor's somewhere, i plan to i find it n' give it a try)...go through the ingredients list and you will know why i wanted to call it a Chaat....it's really really easy to make, especially so if you have some left over plain rice and want to try something different. So here you go...

* i made enough only for one person, and i'm mentioning the quantity used according to that. (you see i'm still on my "cooking for one" week)

Ingredients:

1. Cooked Rice: 1cup
2. Oil: 1/2 to 3/4th tsp
3. Cardamom: 1no
4. Jeera: 1/2tsp
5. Onion: 1no (chopped)
6. Ginger Garlic Paste: 1tsp
7. Tomato: 1no (chopped)
8. Capsicum: 1/2 piece (chopped)
9. Green Peas: 2tbsp
10.Carrot: 1 small (cut it into small cubes)
11.Beans: 4-5nos (thin slices)
12.Pav Bhaji Masala: 1tsp
13.Red Chili Paste: 1/2tsp (i used paprika powder instead)
14.Lemon Juice: 2-3 drops (add only just before serving)
15.Salt: as per taste
16.Coriander Leaves: 2tsp (chopped)
17.Water

* though the original recipe didn't ask for it, i added one chopped green chili too

Method:

Step 1: Heat Oil in a kadai, add the cardamom and jeera. After 20seconds, add the chopped onion
and ginger garlic paste n' fry it until lightly brown.

Step 2: Add the chopped tomatoes and the other vegetables that you are using. Add a little water and cook for 5mins.

Step 3: Add the pav bhaji masala, chili paste and salt. Allow the masala to cook and you will see oil separating.

Step 4: Add the cooked rice and mix well. Let it cook for a while.

Step 5: Add the chopped coriander leaves and sprinkle the lemon juice. Mix it well and it's ready.

Serve it hot with some masala papad and raita.

p.s. i had called the recipe vegetable biryani by mistake.....they broadcasted the show again i realised the recipe here is Tawa Pilaf by Sanjeev Kapoor n' not Vegetable Biryani. I'm really sorry about the error.

Thursday, April 8, 2010

Dahi Aloo Curry


With summer here, i'm trying to find news ways of adding Dahi/Yogurt into our meals, other than the south Indian dish Mooru Curry (buttermilk curry)that goes really well with rice and some fried fish or meat, i haven't tried many.

I came across this recipe by Monica Bhide, an engineer turned food writer, who is the author of Modern Spice: Inspired Indian Flavors for the Contemporary Kitchen. Read more at her blog A Life Of Spice. She mentions that the key to making this curry is to watch the heat when you add the yogurt. If your pan is too hot, the yogurt will curdle. Just lower the heat, add the yogurt slowly, and you will be rewarded with a fantastic curry. It's apparently served at Tabla restaurant in New York City, a contemporary Indian-French restaurant.

Ingredients:

1. Oil: 3tbsp
2. Mustard Seeds: 1 tbsp
3. Cumin Seeds: 1 tbsp
4. Red Chili: 1no (crushed)
5. Curry Leaves: 3 sprigs
6. Turmeric Powder:1/2 tbsp
7. Ginger (fresh): 2-inch piece (peeled and minced)
8. Yellow Onion: 1 small (peeled and thinly sliced)
9. Serrano Green Chili Peppers: 2 (fresh)
10.Tomatoes: 2 Small (diced)
11.Whole Milk Yogurt: 1 liter
12.Water: 1 liter
13.Potatoes (fingerling potatoes): 10nos (boiled n' cubed)
14.Salt to taste
15.Pinch of sugar

Method:

Step 1: Heat a large stew pot over moderate heat and add the oil after the pot is hot.

Step 2: When the oil shimmers, add mustard seeds. When the mustard seeds pop, add cumin, red chili and curry leaves.

Step 3: Cook for 1 minute, then add ginger and turmeric and cook for another 20 seconds.

Step 4: Add onion and green chilies and saute for 2 minutes. Add the tomatoes and cook for 2 more minutes.

Step 5: In a large bowl, whisk the yogurt and water together.

Step 6: Turn the heat to low. Let the pan cool down for about 5 minutes. Add the yogurt and water to the pot along with the potatoes. Simmer for 20 minutes stirring constantly. Be sure the heat is low or the yogurt will curdle.

Step 7: Season with salt and a pinch of sugar.

The only changes i had made to the above recipe were, I used the red Indian onions instead of yellow ones, i didn't have any fingerling potatoes, i used the regular ones and i used the regular Indian green chilies. Also, i didn't add this much water.

Tuesday, July 28, 2009

Rajma - Red Kidney Bean - Indian Curry

This is one dish i can make n' make it well even in my sleep. I have made this a countless number of times as my husband loves it. Infact i made this for him even before we got married n' i'm sure one of the major reason for us being married today is my rajma curry....;)

So here we go.....
Ingredients

Rajma: 1 1/2cups (soaked overnight or at least for 6-7hrs)
Water: 6-7 cups (at least)
Onion: 2 nos (medium)- (finely Chopped)
Ginger Garlic Paste: 1 1/2tsp (preferably fresh) (if u are using ready made i guess 1 tsp will do)
Tomato- 1-2nos (Chopped)- puree it if you like... might taste better...
Cream/ Curd: 1 tbsp (optional)
Salt- as per taste
Oil: 3-4tbsp (the recipe book i had consulted 4yrs ago said some 6tbsp)
Coriander/Cilantro Leaves & Green Chili: for garnishing
MASALA POWDER
Chili Powder: 3/4tsp
Turmeric Powder: 1/4tsp
Coriander Powder: 2 tsp
Garam Masala: 1tsp
Amchoor: 1/4tsp (optional) but adding it brings a great flavour
FRESH GARAM MASALA
Black Pepper Corns: 4-5nos
Cardamom: 2nos
Bay Leaf: a small piece
Cinnamon: 1 small piece
Cumin Seeds: 1/2 tsp

Method

Step 1: Pressure cook the soaked rajma for 30mins on low fire. I cook it with salt as i think it tastes better this way.

Step 2: Grind fresh garam masala (preferably by hand in a mortar and pestle). Add oil into a hot wok and add this ground garam masala once the oil is hot.

Step 3: Add chopped onion and the ginger garlic paste. Fry it well so that the raw taste won't remain.

Step 4: Add all the masala powder to this. Add a little water from the water in the cooked rajma. If you are cooking the rajma and making this gravy at the same time then this won't be possible, if so then add just a little plain water. Cook it till oil separates.

Step 5: Add chopped/ puree tomatoes. Fry it till its really soft and squash the pieces if any with a spoon.

Step 6: If you are adding cream or curd...add it now. The color of the gravy will turn a light brown at this point. Stir it for a min or so n' it will turn back into the dark brown color.

Step 7: I add some cooked rajma to this gravy at this point n' mash it up together to get a thick paste. Ok...this step can be avoided too...but somehow i like doing this. ;)

Step 8: Add only the beans to the gravy and cook for a while, stirring to get the flavour on the rajma. Add the extra water from the cooker and leave it covered for 10mins of so. Add enough water to form a thick gravy (keeping in mind that it will thicken once it cools).
This is ready to serve with some garnish. It tastes really good with Indian Chapatti and plain rice and i almost always serve it with an easy cucumber salad. My husband is does not eat most of the veggies everyone likes (if cooked), but if given as a salad (those that can be used for a salad) he will finish the whole thing without any problems. ;) I also use the same ingredients and follow the same steps to make Lobia (Black Eyed Peas- Indian Curry).

Related Posts with Thumbnails