Pages

Saturday, May 28, 2011

Chettinad Chicken


Photobucket


I'm a big fan of chettinad cuisine, just the thought of the Beef Chettinad that I had in Goa, during our vacation in Decemeber, still makes my mouth water. But I haven't tried a lot of chettinad cuisine at home, other than this Egg Chettinad I had made long back. Rj had to go out of station on a family emergency n wanted to make something nice for him for dinner the day before he left.

Photobucket


In a situation like this, I find it easy to rely on cooking expert Sanjeev Kapoor's recipes. I have complete faith in his recipes, like I always say they will never let you down, even if you are trying it for the first time! That's how I decided on  Sanjeev Kapoor's Chicken Chettinad recipe. I have followed his instructions to the last dot n' it was amazing. I have always favoured my Darbar Ki Karahi and Murgh Makhani recipe for chicken if I want to make chicken it for a special occasion, but I have to say, this recipe is gonna be a stiff competition to all my previous chicken recipes. So here you go...

Photobucket


Ingredients:

1. Chicken : 500gms/ half a kilo
2. Dry Red Chilies: 5 whole pods
3. Coconut: 1/2 (scraped)
4. Poppy seeds (khuskhus): 1 tsp
5. Coriander seeds: 1/2 tsp
6. Cumin seeds: 1/4 tsp
7. Green cardamom: 1no
8. Clove: 1no
9. Cinnamon: 1/2 an inch piece
10. Star anise: 1/2
11. Fennel seeds (saunf): 1/2 tsp
12. Ginger: 1 inch piece  (roughly chopped)
13. Garlic: 5-6cloves
14. Oil: 1/4 cup (the original recipe used olive oil, but I used regular sunflower oil)
15. Onion : 1no (medium) chopped
16. Curry leaves: 10-12
17. Tomato: 2 small or 1 large (chopped)
18. Red chili powder: 1/2 tsp
19. Turmeric powder: 1/4 tsp
20. Lemon juice: as per taste
21. Coriander leaves: 1tsp (chopped)
22. Salt: as per taste

Method:

Step 1: Roast dry red chillies, coconut, poppy seeds, coriander seeds, cumin seeds, green cardamom, cloves, cinnamon, star anise, fennel seeds in 1 tbsp of oil

Step 2: Grind the above into a paste along with ginger and garlic. (my mallu instinct worked overtime n' i tried using my new stone pestle n' mortar unsuccessfully to do this, so I had to do a little twist later, which I will mention)

Step 3: Heat the remaining oil in a kadai/wok and fry onion till golden. Add curry leaves and the ground paste and sauté for some time.

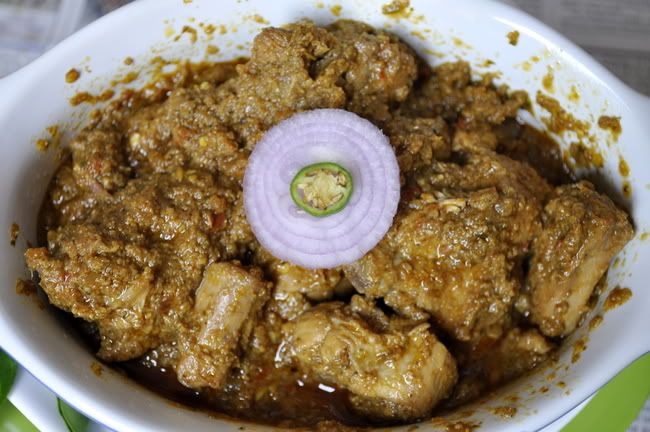
Step 4: Add tomatoes, red chilli powder, turmeric powder and salt to taste. (at this stage I could see that my paste needs to be a little more ground n ground the same in a mixer grinder to a fine paste. That is the reason why you can't see any tomato pieces or curry leaves in my pictures) Once I ground the same into a thick paste, I sauteed them for a min more in the same kadai without adding more oil.

Step 5: Add chicken and mix. Cook for five minutes and then add two cups of water, lemon juice, cover and cook till the chicken is done.

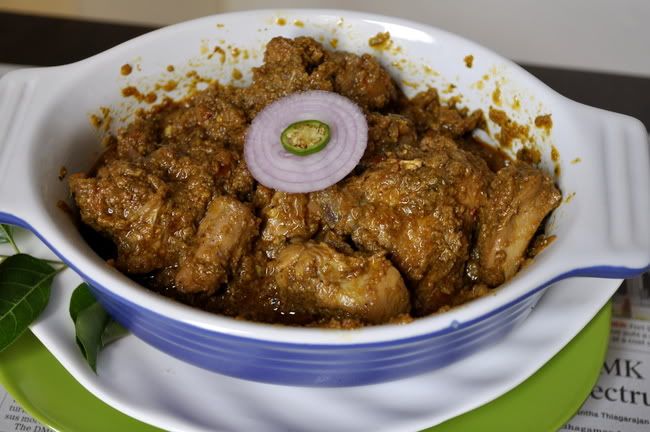
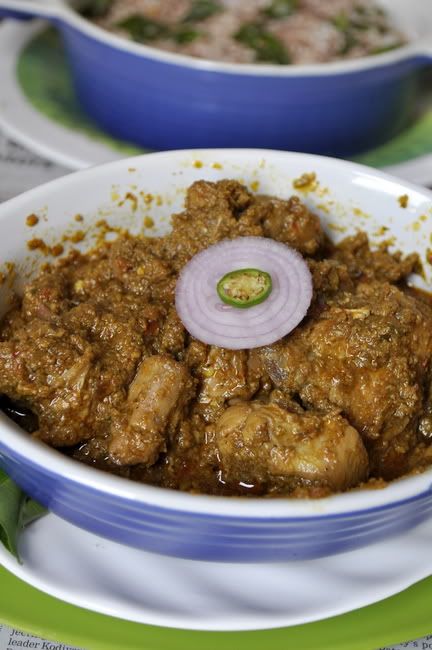
Step 6: Serve hot garnished with coriander leaves.

Photobucket


It is best served with hot rice or chapathi or even paratha. But I served it with puttu, coz after taking time out to decide on what to make n' the whole process above I had time only for something simple like puttu. :) Happy Cooking!!!

Photobucket

Friday, May 27, 2011

Vendakkai Curry/ Okra in Coconut Milk Gravy

Today I was looking for a snap I had clicked of my niece a while back n' I found 3 dishes that I had not posted up here yet :). (This is dish no. 3 ). All these snaps were taken a little after we moved to Bangalore. I'm guessing, I just didn't have the time to post them up then. I'm gonna post all three today, just coz I already have too many dishes I had made this week which i'm yet to post. These recipes are good, but the snaps lack imagination, so don't let that fool you.


Photobucket


This dish was made at home in Kottayam, during one of my visits. I didn't make it, I just helped :). I suggested to amma saying that let me make this a guest post by her. She just point blank refused, saying if she were to do a guest post, might as well do something a little more complicated. lol. So the next time I go home, I'm gonna click some snaps of her complicated dishes...:)..This curry is really simple, easy to make n' very light. Amma actually takes the first extract n' the second extract from the coconut where ever she needs to use coconut milk. I guess store bought coconut milk, might not give this light texture. So here you go...


Photobucket


Ingredients:

1. Okra/ Vendekkai: 10nos (each cut into 3 pieces)
2. Onion: 1no small (sliced)
3. Green Chili: 1nos (sliced)
4. Ginger Garlic Paste: 1tsp
5. Chili Powder: 1/2 tsp
6. Turmeric Powder: 1/4tsp
7. Coriander Powder: 1 tsp
8. Coconut Milk: from half a coconut (first n' second extract)*
9. Salt: as per taste
10. Curry Leaves: 1sprig
11. Oil: 1tsp
12. Water- 1/4 cup
13. Vinegar- 1/2tsp
14. Black Pepper: enough to sprinkle on top

* if using store bought coconut milk, then 3/4 to a cup should do.

Method:

Step 1: Stir fry the okra pieces in a little oil for 3-4mins. Set it aside.

Step 2: Add a little more oil into the same kadai, add mustard seeds n' curry leaves n' allow it to splutter.

Step 3: Add the chopped onion, green chili n' ginger garlic paste to the above. Allow it to cook till the onions turn pink.

Step 4: Add the powders, turmeric, red chili n' coriander powder to the above. Add salt. Mix it well for the masala to cook properly.

Step 5: Add the pan fried okra into the above, stir it well with the masala.

Step 6: Pour some water n' cook it covered for 2-3mins (depending on how crunchy you want it to be)

Step 7: Add the second extract of the coconut milk first n' add the vinegar at this stage. (if you don't want to use vinegar, you can use a little lime juice or one chopped tomato.) Add the first extract of coconut milk to this. If you are using store bought coconut milk, do this in one step.

Step 8: Sprinkle some black pepper powder or garam masala on top n' its ready to serve.

This is best served with some hot rice. :) Happy Cooking!!!


Photobucket

Sprouts Masala (Dry)

Today I was looking for a snap I had clicked of my niece a while back n' I found 3 dishes that I had not posted up here yet :). (This is dish no. 2 ). All these snaps were taken a little after we moved to Bangalore. I'm guessing, I just didn't have the time to post them up then. I'm gonna post all three today, just coz I already have too many dishes I had made this week which i'm yet to post. These recipes are good, but the snaps lack imagination, so don't let that fool you.

Photobucket


I love having sprouts, you must have figured that out from the salad recipes, like Chicken Aioli Salad n' my Spinach Salad with Alfalfa Sprouts n' Feta Cheese here. We normally eat it fresh in a salad n' since that taste great, I never thought of trying anything else. But my mom in law makes this really nice dry masala with this n' Rj is a big fan. Besides, who wouldn't like making a dish that their mom in law makes to perfection? lol. Ever since I made this the first time, we have had this as a side dish for chapathi almost every other week. Try it, its really nice... So here you go.

Photobucket


Ingredients:

1. Sprouts: 2 cup (I use Moong sprouts)
2. Onion - 1no (chopped)
3. Garlic: 3-4nos (crushed)
4. Tomato: 1no (small) chopped
5. Salt: as per taste
6. Cumin Seeds - 1/2 tsp
7.Chili Powder - 1 tsp or 1/2tsp (as per taste)
8.Turmeric powder - 1/4tsp or a little more
9.Garam Masala - a pinch or 2
10.Oil

Method:

Step 1: Heat oil in a kadai/wok. Add the cumin seeds n' let is splutter.

Step 2: Add the chopped onion n' crushed garlic to this. Fry it till the onions become translucent.

Step 3: Add the turmeric powder n' chili powder to the above. Stir it, allowing the masala to cook.

Step 4: Add the chopped tomatoes to this. Let it mix well in the masala. Add salt.

Step 5: Add the sprouts to this n' mix it well with the masala. Sprinkle some water on top n' cover it to cook it for 8-10mins. If it too dry stir it once in a while so that it doesn't stick to the bottom of the pan.

Step 6: Stir the above, adjust the salt, sprinkle some garam masala on top. Mix it well n' its ready to serve.

If you would like to give this dish a little pungent taste, sprinkle some lemon juice over it before serving. Happy Cooking!!!

Photobucket

Drumstick Stir Fry/ Murungakai Ularthiyathu

Today I was looking for a snap I had clicked of my niece a while back n' I found 3 dishes that I had not posted up here yet :). (This is dish No.1 for today). All these snaps were taken a little after we moved to Bangalore. I'm guessing, I just didn't have the time to post them up then. I'm gonna post all three today, just coz I already have too many dishes I had made this week which i'm yet to post. These recipes are good, but the snaps lack imagination, so don't let that fool you.

Photobucket

I love drumsticks, growing up we had 2-3trees at home n' I used to never like them. Especially coz amma used to make so many things with drumsticks n' its leaves. :(...But ever since I start cooking, a Sambar for me is just incomplete without drumsticks in them. My best friend, Sandhra got married recently n' her mom in law (a great cook again) lives with them. Just as well, as Sandhra doesn't enjoy cooking at all these days...:) But I think its just a phase,(havevn't we had a time like this?) she will find her groove again soon. So anyways, her mom in law made this for her one day n' she was raving about it to me. So I just had to try it n' it turned out really well. Only thing is eating this is a very hands on job. :) So here you go.

Photobucket


Ingredients:

1. Drumsticks: 2nos (cut like in the snaps)
2. Water: 1/2cup
3. Salt: as per taste
4. Green Chili: 1no (chopped)
5. Onion: 1/2 an onion (chopped)
6. Oil: 2-3tsp
7. Mustard: 1/2 tsp
8. Curry Leaves: 1 sprig

Method:

Step 1: Boil the drumstick piece in water mixed with salt. Once the drumsticks are cooked, let the water evaporate. (add a little more an 1/2 a cup of water if required to cook them well).

Step 2: In a kadai/wok, heat oil, splutter the mustard seeds n' curry leaves.

Step 3: Add the chopped Onion n' Green Chili. Let it brown.

Step 4: Add the cooked drumsticks to this n' stir fry it well.

This is ready to serve with some Mooru n' Hot rice. :) Happy Cooking!!!

Photobucket

Thursday, May 26, 2011

Paneer Bhurji/ Scrambled Cottage Cheese

Photobucket

My amma came n' stayed with me for a week n' my relationship with milk completely changed. :)...does that sound weird? But really, I couldn't make you understand what i'm talking about any other way. Now, I make curd, fresh cream, butter n' ghee at home. Well not all in one day...but you get the picture. I never knew it could be this easy. Cooking for 2, the only thing out of this which has a lot of demand on a daily basis is curd n' love how well the curd sets. I could give all the curd companies out there a run for their money...lol.

Photobucket

I'm digressing, what I wanted to say was, previous to amma's visit the only milk product I used to make at home is Paneer. But the major problem with it was I could never cut perfect cubes/squares etc out of my home made paneer. Coz they won't hold a shape like that. I would hang it in a muslin cloth n' end result is always a large ball liked shape that would love to crumble. So I had stopped making paneer at home for my dishes like Punjabi Paneer Makhani, Hara Bhara Paneer n' Paneer Tikka Masala. But my homemade paneer especailly coz it loves to crumble is best for Paneer Bhurji. On a day when you are not in the mood for elaborate cooking, this is just perfect with Chapathis. By the way I follow the Vahrehvah Chef Sanjay Thumma's instructions to make paneer at home.

Photobucket


This dish is by far the only thing I make without a written recipe. I searched online n didn't find any recipe I liked n' thought to myself, how difficult can making something like this without a recipe be. So here you go, my version of a Paneer Bhurji. :)

Photobucket

Ingredients:

1. Paneer: 200gms (soft paneer) crumbled.
2. Onion: 1no (small) chopped
3. Garlic: 4-5nos (chopped)
4. Tomato: 1no (deseeded) chopped
5. Greenchili- 2nos
6. Capsicum/ Bell Pepper- 1no (deseeded n' cubed)*
7. Egg: 1no (optional)
8. Turmeric Powder: a pinch
9. Chili Powder: 1/2tsp
10. Garam Masala: a pinch or 2
11. Oil
12. Mustard seeds- 1/2tsp
13. Curry Leaves
14. Salt: as per taste

* I have used yellow, red n' green capsicums just to get that burst of color, you can just use any one color n' it would still taste nice.

Method:

Step 1. Heat a oil in pan, add mustard seeds n' curry leaves. Let it splutter.

Step 2. Add chopped onions, garlic n' green chili and leave it to cook. (2-3mins on medium flame)

Step 3. Add turmeric powder, chili powder n salt, mix it well. Allow it to cook well.

Step 4. Add the chopped tomatoes to this.

Step 5. If you are adding eggs, scramble it in another pan n' add scrambled eggs to the above mixture. (I like the texture better this way, but up to you if you want to add the beaten egg directly to the above mixture, you can.)

Step 6. Add the chopped paneer to the above n' mix it well. Leave it to cook for a while. (Ensuring that the paneer does not harden).

Step 7. Add the cubed/chopped capsicum to the above. Mix it well n' allow it to cook for another 3-4mins.

Step 8: Check for salt n' add more if you need it. Sprinkle some garam masala on top n' its ready...:)

Happy Cooking!!!

Photobucket

Wednesday, May 25, 2011

Shahi Falooda or The Royal Falooda

Photobucket

Falooda is said to be an adaptation of the Persian dessert 'Faloodeh' and was brought to the Indian subcontinent during the Mughal period. It is a very popular cold dessert or beverage in India now. My mom used to make this for us every summer. Open the refrigerator and there will be this tall glass jar filled with pink milk n' I used to fall in love with it. I could never get enough of it. The best part of it was just not the color but the sabza seeds (basil seeds), I mean I had never seen anything like it before. When dry its all black n' dry n' the moment you pour some water over it, it just transforms. Not many children or adults even had heard about sabza seeds back when me n my sister were in school n' it became a popular drink with our friends n' cousins who would visit home.

Photobucket

This time when my nieces came over for vacation, I kept some ready for them along with the Mango Ice Lollies n' needless to say they loved it. Rj didn't get more than a sip or two n' its one of his favourite summer drinks too. So once my chechi (sister) n' the kids left, I had to make it again just for amma n' Rj. That's when I asked amma for the first time, how she used to add the sabza seeds back then. My mom is a home science major n' have always liked cooking. She says the popular Indian magazine, FEMINA was a galore of awesome recipes n' tips in the 70's n 80's. I think, maybe even the early 90's, but now, sadly, its mostly pages n' pages of articles on make up n' gossip....(which I have no use of). So for the first time, my mom had Falooda at a northindian restaurant in Kottayam Main Bus Stand (her older brother (my uncle Thuppan) had taken her there before heading home from college one day). This was when she was 15-16yrs old, and the drink had Sabza seeds in it.

Photobucket

Years later, after she got married, she found this recipe for Falooda in a Femina. She found the sabza seeds in a traditional ayurvedic herb shop in Kottayam Chandha/Market. That's how this was a popular drink at a small Keralite, South Indian household in the 80's. (the recipe itself is going to occupy only half the space my ranting has taken up...lol) So here you go...

Photobucket


Ingredients:

1. Milk: 1 Ltr
2. Sugar: 1 cup
3. Cornflour- 2tsp
4. Rose Essence- 1tsp
5. Red Color- 1pinch or a little more (feel free to decide how dark or light you want it)
6. Sabza/ Basil Seeds: adequate
7. Vermicelli: 4tsp (optional)
8. Long grain Rice (pan fried n' coarsely ground): 2tsp (optional)
9. Jelly: 4tsp (chopped) (optional)
10. Ice cream of your choice: 3-4scoops

Method:

Step 1: Cook the vermicelli in boiling water. Strain and keep aside to cool. Then chill in refrigerator till needed.

Step 2: Add water to Sabza Seeds n' keep it aside. They will soon start to swell and look transparent with a small dot-like, black center. Strain and keep it aside in a small bowl.

Step 3: Keep aside 1/4cup of milk. Add sugar to the rest of the milk and boil it. Add the milk kept aside to cornflour and mix it well to dissolve it completely. Once the milk and the sugar mixture boils, add the cornflour mixture to it along with the fried ground rice. Stir the milk to thicken the milk. Keep it aside to cool completely.

Step 4: Add the rose essence and color to the milk. Chill in refrigerator till needed.

Step 5: To assemble the Falooda, in each glass, put a tsp of jelly, vermicelli, pre-soaked Sabza seeds. Now the falooda over them. Add a scoop of ice cream to this.

Garnish it with some slivered almonds and pistachios, if desired (i didn't do so). Add a straw and long-handled spoon and serve! Happy Cooking!!!

Photobucket

Tuesday, May 24, 2011

Kottayam Banana Ghee Roast...;) vs. French Caramalised Bananas

Photobucket

This was my appa's (father's) favourite evening snack. I remember amma making this n' keeping his share aside as soon as she makes it coz otherwise I would have finished it in no time. So I guess I liked this as much as appa did. I miss my father terribly, so many decisions would've have been taken out of my hands, making life so much simpler. He loved taking over. :) He was intelligent, complex, shrewd n' vulnerable if that is possible. Irrespective of having been a terrible teenager n a rebel, every single day I hope he knew/knows how much I loved him.


Photobucket

Coming back to this recipe, Rj doesn't enjoy this at all n' I'm secretly pleased with that, coz I still love it just as much n' don't mind not sharing it with anyone. I'm not sure this can be called Banana Ghee Roast, coz you just doing a quick shallow fry than roast, but the name sounded so suggestive I couldn't resist using it. :) I must say I haven't made evening snacks since ages, that custom is just not followed in my home. I guess mainly coz when I was working, we both came back home only after 7.30-8.00pm almost everyday. So anyway, I saw the French Chef, Manu Fiedel, making Caramalised Banana Fry on TV n' just couldn't resist making the Kerala/Kottayam version of it. I will mention his version in a little more detail below. :) So here you go.


Photobucket


Ingredients:
1. Banana- 1no (preferably overripe ones)
2. Ghee- 1-2tsp (or more depending on how much juice you want in the end)

3. Sugar- for sprinkling

Method:

Step 1: Cut the whole banana into 2 or 3 depending on how long you want the slices to be. Slice each piece vertically (as seen in the snaps).

Step 2: Heat ghee in a frying pan, arrange the slices of banana without overcrowding it and shallow fry them.

Step 3: Arrange them in a plate n' sprinkle it with some sugar. And its ready. Serve it with some ice cream if you like to create a Dessert version of the snack.


Photobucket

The last time I went home, Amma made these for me using home grown bananas n' I swear the bananas were so sweet, I didn't have to add any sugar. Now for Chef Manu Fiedel's Version.

He used Butter instead of Ghee, used a lot more than my version. He added brown sugar into the hot butter first and then added the bananas whole instead of slicing it. To make the whole thing look a lot more exciting, he even flambé-d them in the pan ;) and served it hot with some vanilla ice cream. I must say it looked divine. But my craving for the home version, made me try that instead. Happy Cooking!!

I would like to thank Asha from A Tasty Challenge for the award she passed on to me.
Her blog not only has some really yummy recipes, but she had actually taken on a challenge to finish 262 recipes in 365days n' completed the same this May. I'm in awe, kudos to you Asha.

Wednesday, May 18, 2011

Chicken Sammies

I'm feeling all down just coz my bestie, Nidz is unwell n' is not on FB today...:(....I would love to type more here just to keep myself occupied but don't want to bore you :)....So coming to this post, I love having sandwiches for breakfast especially on weekends, they are simple, easy n' you can add just about anything you fancy as an ingredient and it never fails...My amma specialises in sandwiches n soups I think (she makes them in a jiffy). She insisted I keep a few pieces of the chicken aside last week before making a curry and guess what? I was able to use that for these sammies. ;)I love referring to sandwiches as 'Sammies'. I made just enough for 3ppl, so please increase the quantity as per your requirement. Here you go...

Photobucket


Ingredients:

1. Bread: 10slices
2. Chicken: 4-5 boneless pieces (medium sized- make them smaller to cook faster)
3. Onion: 1no (medium) finely chopped
4. Green Chili: 1 no (finely chopped)
5. Ginger: a really small piece (chopped or coarsely crushed)
7. Carrot: 1no (grated)
8. Coriander/ Cilantro Leaves: 1tsp (chopped)
9. Salt
10. Pepper
11. Oil
12. Butter: for spreading
13. Egg: 1no
14. Cheese: (optional)

Method:

Step 1: Cook the boneless chicken (small) pieces with a little salt n very little water. Keep checking to see if the water has evaporated. (Add little more water if n when you see that the water has evaporated before the chicken pieces are cooked through). Once done, keep it aside to cool.

Step 2: In a pan heat oil, add the chopped onion, green chili n' ginger and allow it to cook well.

Step 3: Add the grated carrots to the above n' keep it covered and cook it for 3-4mins.

Step 4: Scramble the egg in a separate pan and add the scrambled eggs to the above.

Step 5: Shred the chicken pieces and add it to the above along with chopped cilantro.

Step 6: Keep it covered n' cook for another 2mins, stir well n' adjust the salt. Add freshly ground pepper according to your preference of spice. (you can add a little garam masala instead of pepper at this point if you want, though I didn't do so)

Step 7: Spread some butter on one slice of the bread, add the filling, top it with some shredded cheese (if you are using any) cover it with another slice n' grill it in a sandwich maker.

Photobucket


I think this filling tastes better with grilled than plain bread. I know the snaps aren't looking as 'bite into me' as I wanted them to, but trust me it tastes great. I'm sending this also to the event Souper (Soup, Salad & Sammies) Sundays hosted by Deb from Kahakai Kitchen. Happy Cooking!

Photobucket

Tuesday, May 17, 2011

Pani Puri- Nirvana at Home

Photobucket


I had gone missing from blogsphere for a week simply coz I had a home full of loved ones n' was happy being busy. My mom n' my sister n' family were here with me for a vacation n' I had a great time with them....the best part about moving back to India is the amount of time I get to spend with my family. Coming back to this post. I can easily call Pani Puri my all time favourite snack....when I say all time, I really mean it....I can have it all the time/ anytime of the day n' relish it. For those who have never had it, Pani Puri is a popular street snack in India. It comprises a round, hollow puri, fried crisp and filled with a mixture of water, tamarind, chili, chaat masala, potato, onion and chickpeas. It is small enough to fit completely in one's mouth. The first time I had them was when I moved to Bangalore for my studies 10yrs back. I couldn't hold the whole puri in my mouth the first time around n' I remember thinking to myself 'how did I live to be 20 without ever tasting this?' I hunt for the best Pani Puri joint everywhere I go. In Bahrain, I had a Biharikaka who made such divine pani puri....n' he wud give me 2 extra sukka puri just to see how happy it made me, I think. ;)

Photobucket


I could have pani puri off the street vendor n' not think too much about it, but gone are those days....i'm more concerned about hygiene of the food n' the environment now. I don't eat pani puri or anything which uses water or fresh fruits n' veggies from a street vendor anymore. My youngest cousin,Indhu, who I love more than I can say, recently got typhoid n' was in really bad state. She was admitted in the hospital for 2weeks n' she has a small baby gal aged just over 1yr...everyone was so so worried about her. But now she is feeling better, the once healthy gal has become less than half her size, with really bad intestinal problems. I'm mentioning this in detail just so I can give out a word of caution to all who likes to eat from the streets. She caught it eating chat n' drinking some masala drink from one of the street vendors in Delhi. I also have to mention that her sis in law who ate/drank from the same place is ok. But really, the moral of the story is just that one needs to be cautious of where and what you are eating.

Photobucket


Koshy's Calcutta Chat on Brigade Road dishes out the best chat in town for me, including a good pani puri. But that being a little far off n' me not frequenting Brigade Road anymore meant I have to find a new source...My mom n' my sister loves pani puri too, so I decided to make it for them. My mom found it hilarious that she has to wait for me to finish taking some snaps before they could dig in....lol..;). I used ready to use small puris n' pani puri masala for the water. So here you go.

Photobucket


Ingredients:

1.Puri: 20nos

For the Filling:

2.Potato – 3 nos (medium-sized, boiled with salt, peeled and mashed)
3.Garlic – 2 to 3 pods (finely chopped)
4.Ginger – 1/2″ long piece (crushed/minced)
5.Coriander/Cilantro – 2tbsp (finely chopped)
6.Green Chili (optional) – 1 no (finely chopped)
7.Chili powder – 1 tsp
8.Garam Masala – 1 tsp
9.Cumin Powder – 1 tsp
10.Coriander Powder – 1/4 tsp
11.Amchur Powder/ Dry Mango Powder (optional) – 1/2 tsp
12.Salt – to taste
(add some fresh moong sprouts to get some extra flavour, I didn't have any with me so I didn't add it this time.)

For the Water:*

13. Everest Pani Puri Masala: 2tbsp
14. Lemon Juice: of half a lemon (medium size)
15. Mint Leaves: a palm full (crushed)
16. Salt: as per taste (keeping in mind that the masala already has some salt in it)
17. Green Chilli Paste: 2tsp
18. Tamarind Pulp: 2tsp
19. Dry Mango Powder: a pinch or 2
20. Water: as required (i used roughly 2cups)
21. Boondi
22. Chopped Onion

*all the ingredients mentioned under pani puri water, can be adjusted according to taste. I have mentioned how much I have used, but change it according to your taste.

Photobucket


Method:

Step 1: Mix all the ingredients required for the Pani Puri water n' keep it aside. If you like the water chilled, keep this mixture in the refrigerator at this point. (I don't like mine chilled so I didn't do this). Do not mix the boondi n' chopped onions at this point. You can add that on top while serving.

Step 2: Mash the boiled potatoes n' mix all the ingredients. Keep it aside.

You are actually ready to serve. Even though the list of ingredients seems long, it requires hardly any prep time. Also, if you want to serve it to guests, you can do all the preparation in advance n' make the holes in the puri n' stuff the filling in, dip it in the pani puri water n' there you have it....;) mouthful, eyeful n' wonderful....lol

Photobucket

Tuesday, May 3, 2011

Dal Makhani

I wasn't particularly fond of Dal Makhani (have on many occasions tasted bad ones) until we went to Mast Kalandar-a North Indian vegetarian food chain popular here in Bangalore. Rj orders for the meal option Phindi Chole almost every time we go there. Along with Chole n' Roti comes this really tiny bowl of Dal Makhani n' I love the texture n' the taste. Its just so so creamy. So I decided if they could make it taste this good, I could at least try making it at home.... :)

Photobucket


I had two choices for recipes to follow, one was from the book Learn to Cook by Nita Mehta and the other option was to follow Sanjeev Kapoor's recipe. As I was about to start cooking, Sanjeev Kapoor's recipe won by a thin margin coz Nita Mehta's recipe called for 'jaiphal powder' as one of the ingredients and I had no clue what that was. Only after I finished cooking did I get a chance to google that....n' found that she just meant Nutmeg Powder...lol

Although my intention is not to specialize on Sanjeev Kapoor recipes, I might just end up doing that at this rate. So here you go...:)

Photobucket


Ingredients:

1. Whole Black Gram or Urad Dal: 1/2 cup
2. Red Kidney Beans or Rajma: 2 tbsp
3. Salt to taste
4. Red chili powder: 1 tsp
5. Ginger: 2 inch piece (chopped)
6. Butter: 3 tbsp
7. Oil: 1 tbsp
8. Cumin seeds: 1 tsp
9. Garlic: 6 cloves (chopped)
10.Onion : 1 large (chopped)
11.Green chillies: 2 (slit into 2)
12.Tomatoes: 2 medium (chopped)
13.Garam masala powder: 1 tsp
14.Water: as required for cooking

Method:

Step 1: Wash and soak sabut urad and rajma overnight in three cups of water. Drain.

Step 2: Pressure cook sabut urad and rajma in three cups of water with salt and half the red chili powder (you can add half the ginger too if you wish) for three whistles. Open the lid and see if the rajma is totally soft. If not cook on low heat till the rajma becomes totally soft.

Step 3: Heat butter and oil in a pan. Add cumin seeds.When they begin to change colour, add ginger, garlic and onion and sauté till golden.

Step 4: Add slit green chillies, tomatoes and sauté on high heat. Add the remaining red chili powder and sauté till the tomatoes are reduced to a pulp.

Step 5: Add the cooked dal and rajma along with the cooking liquid. Add some water if the mixture is too thick.

Step 6: Add garam masala powder and adjust the salt. Simmer on low heat till the dals are totally soft and well blended. Serve hot.

Best served with rice and roti. I think this recipe is little less richer than the ones which asks for cream as an ingredient and I would call this a really easy recipe. Another surprising thing about this recipe and the Rajma Recipe is that it tastes even better when served the next day. :) Happy cooking!

Photobucket

Monday, May 2, 2011

Royal Bread & Butter Pudding- Princess Di's Favorite Pudding

Princess Diana had a fondness for the Bread and Butter Pudding that was made by her personal Chef Darren McGrady. He shares this recipe in his cookbook "Eating Royally". If someone were to ask me to think of the most good looking woman ever, I will say 'Princess Diana' without a blink of an eye. I found everything about her charismatic, there was something just so genuine about her.

Photobucket


So anyways, coming back to this recipe, I had never ever made a bread pudding. (I wonder if I'm the only one out here who has never made one...)We have shifted to Oat meals for breakfast instead of bread...so when ever I buy bread now, I end up with left over. I decided to try this recipe just for luck n it clicked. Whats more...I have followed Princess Diana's favourite pudding recipe....;) What with all the hoo ha of the Royal Wedding that got over this weekend, I decided to do a blog post with a Royal Recipe! :) So here you go.

Photobucket


Ingredients:

1. White Bread: 12 slices (crusts removed)
2. Unsalted butter :1 1/2 sticks (melted) *
3. Egg Yolks : 9nos
4. Vanilla Essence: 2 tsp
5. Sugar: 3/4 cup
6. Milk: 1/2 cup
7. Heavy cream: 2 cups
8. Sugar: 2 tbsp (granulated-to dust on top of pudding)
9. Caster Sugar: 2 tbsp
***********************
10.Sliced almonds, lightly toasted : 3 ounces
11.Raisins: 3 ounces
12.Amaretto: 1/4 cup (liqueur)

* I used only 4 slices of bread and reduced my portion accordingly. But the recipe here is directly as it was published. For me 100gms of melted butter was sufficient. In India we don't get sticks of butter, so wasn't really sure how much was required. Also, I didn't add almonds, raisins n' Amaretto coz Rj doesn't enjoy biting into them in his desserts n' cakes. But I believe they would definitely enhance the taste.

Method:

Step 1: If you are using Raisins, soak the raisins in the Amaretto, and leave covered with plastic wrap at room temperature 6 to 8 hours or overnight. If you don't want to add liqueur in your recipe soaking them in Water should be fine.

Step 2: Preheat the oven to 350 degrees. Cut 4 slices of the bread into 1/2-inch dice, and spread the diced bread on the bottom of a casserole dish. Sprinkle the raisins on top of the bread cubes, and pour any remaining liquid over the bread.

Step 3: Cut the remaining 8 slices of bread in half diagonally, and then cut each half slice in half diagonally to create 4 even triangles per slice. Dip the triangles into the butter, and arrange on the top of the raisins, overlapping the triangles slightly. Pour any remaining butter over the top of the bread.

Step 4: Whisk the yolks, vanilla essence, and sugar in a large bowl until combined.

Step 5: Bring the milk and cream to a boil in a heavy saucepan over high heat, and pour the hot mix onto the egg yolks, whisking constantly.

Step 6: Pour the warm egg mixture over the bread, making sure all of the bread is coated, and set aside the coated bread for 20 minutes to allow the egg mixture to soak into the bread.

Step 7: Place the casserole dish in a roasting tray filled with hot water halfway up the sides of the casserole dish, and bake in the oven for 30 to 45 minutes, or until golden brown on top with the filling just set.

Step 8: Remove the dish from the oven and roasting tray, and sprinkle with the extra sugar. Sprinkle with the toasted sliced almonds, and dust with powdered sugar. Cool slightly, and serve warm with a jug of cream and some fresh berries.

Bad snaps are owing to the baking done in the night. :(...but the dish is rich n' nice. The chef says the final texture is a cross between a bread pudding and a crème brûlée. Happy Cooking!

Photobucket

Related Posts with Thumbnails